Solo: A Star Wars Story will be out in theaters soon, so my friend Dave wanted me to bake something to share with him and his co-contributors at Temple of Geek to celebrate. He’s a huge fan of Star Wars and wanted something festive to get everyone even more excited for the movie. So I decided to bake chocolate Wookie Cookies! And since I want others to bake them as well, I did three versions of this recipe so you can pick which fits your skill level and use that recipe to bake away.
Before I get to the recipes, I wanted to share my friend’s website that has all things geeky and nerdy – there are articles, reviews, podcasts, and even a whole section dedicated to cosplay! Click on the image below to get to their website.
![]()
And now, onto the cookie recipes! But first….
Edible Wookie Fur Mixture: All three versions of my cookies will require this. It’s just a combination of crushed up frosted shredded wheat cereal and crunchy chocolate sprinkles mixed together. You can use any flavor of shredded wheat cereal that you want, I used plain. And you can use as much cereal or as much sprinkles as you want, just eyeball it to get the right look you want. Just combine them into a bowl and set aside.

This version is for those who aren’t willing to make their own cookie dough, but still would like to enjoy a Wookie Cookie. Pre-made cookie dough tends to spread out more when baked, so the final product won’t be as ‘furry’ as the other versions.
Chocolate Wookie Cookies: Version One
Ingredients
- Pre-made cookie dough, any flavor
- Edible Wookie Fur Mixture (recipe above)
Steps
- Take about one tablespoon of the cookie dough and lightly squeeze it together with your hand.
- Roll the dough into a ball shape between your hands until it’s slightly sticky.
- Coat the dough ball with the Edible Wookie Fur Mixture and lightly press it down to ensure that the mixture sticks to the cookie dough.
- Place the coated dough onto a parchment lined baking sheet and bake according to the directions on the cookie dough package.

This version is perfect for those who like to make their own cookie dough, but not into tedious decorating. This cookie doesn’t expand much when baked, so a nice coating of the Edible Wookie Fur Mixture will get the idea of a wookie across.
Chocolate Wookie Cookies: Version Two
Ingredients
- ½ of a cup unsalted butter, softened to room temperature
- ⅔ of a cup brown sugar (either light or dark works)
- 1 teaspoon vanilla extract
- ½ teaspoon baking powder
- ¼ teaspoon baking soda
- ½ teaspoon salt
- 1 tablespoon molasses
- 1 tablespoon chocolate syrup
- 1 large egg
- ⅓ of a cup cocoa powder
- 1 ¾ cups all purpose flour
- Edible Wookie Fur Mixture (recipe above)
Steps
- Position an oven rack in the middle of the oven and preheat to 350° F.
- In a large mixing bowl, cream together the butter and brown sugar with an electric hand mixer for 3-5 minutes. It should become pale and fluffy when well combined.
- In the bowl with the butter mixture, add in the vanilla, baking powder, baking soda, salt, molasses, chocolate syrup, and egg. Use the hand mixer and beat together until well combined.
- Using a wooden spoon or other mixing utensil, fold in the cocoa powder until mixed through.
- Add one cup of flour to the mixing bowl and combine using the hand mixer until no dry flour is seen.
- Add another half cup of flour to the bowl and combine with the hand mixer until no dry flour is left.
- With a wooden spoon or other mixing utensil, fold in the final quarter of a cup of flour and combine until no white flour is seen. The dough should form together into a ball easily and be slightly sticky or tacky to the touch.
- Take about a tablespoon of dough and form it into a ball by rolling it in your hands.
- Place the ball of dough into the Edible Wookie Fur Mixture and roll it around, pressing it gently into the coating to ensure that some of it sticks and embeds into the cookie dough.
- Arrange the coated balls of dough onto a parchment lined baking sheet with about two inches of space between them. Then lightly flatten out the balls of dough with your hand – this helps them spread out a bit as they bake.
- Bake in the oven for 15 minutes.
- Once they’re done, let the cookies cool completely on the pan.
This version of the Chocolate Wookie Cookies by far look the most like Chewbacca, but they also require the most labor. If you’re into making detailed cookies, this version is the one you should make! You can decorate these as much or as little as you want. This dough gets tough to mix, so enlist the help of a counter top mixer.
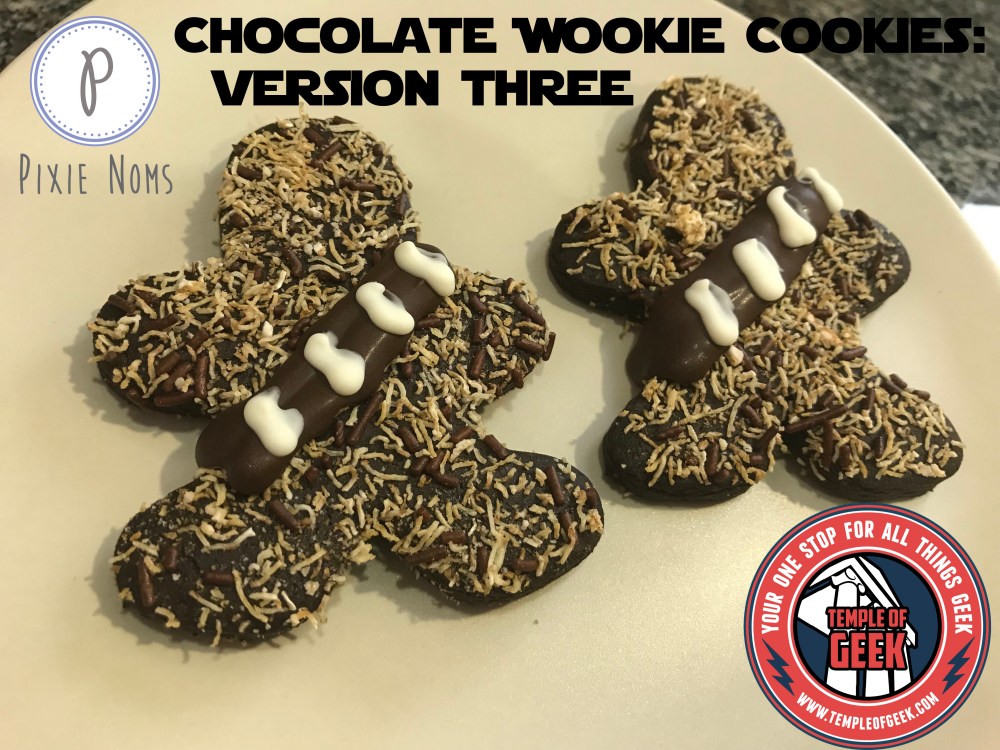
Chocolate Wookie Cookie: Version Three
Ingredients
- ½ of a cup unsalted butter, softened to room temperature
- ⅔ of a cup brown sugar (either light or dark works)
- 1 teaspoon vanilla extract
- 1 teaspoon baking powder
- ¼ teaspoon salt
- 2 tablespoon chocolate syrup
- 1 large egg
- ½ of a cup dark/dutch processed cocoa powder (regular cocoa powder can be used as well)
- 2 cups all purpose flour
- A small dish of water
- Edible Wookie Fur Mixture (recipe above)
- Melted chocolate or colored royal icing or colored butter cream frosting for decorating
Steps
- Position an oven rack in the middle of the oven and preheat to 350° F.
- Using a stand mixer, place the butter and brown sugar into the bowl of it and cream together with a paddle attachment for 3-5 minutes on medium speed. It should become pale and fluffy when well done.
- In the bowl with the butter mixture, add in the vanilla, baking powder, salt, chocolate syrup, and egg. Mix together on medium speed for another 3 minutes.
- Add the cocoa powder into the bowl of the mixer and combine on low speed until well combined. Also, good luck on not getting cocoa powder all over the place.
- With the mixer on low speed, add the flour a quarter of a cup at a time, ensuring that it’s well blended and mixed through before you put in the next. Once all the flour is mixed in, the dough should form together into a ball easily and hold its shape without feeling sticky.
- Place half the dough between two sheets of wax paper or parchment paper and roll out to desired thickness. I rolled my cookies out to ¼” in thickness. If you want them thicker, you’ll have to bake then for longer, if you want them thinner, you’ll have to bake then for a shorter amount of time.
- Using a gingerbread man cookie cutter, cut out as many shapes as you can get from the rolled out dough. Note – you can gather the scraps and knead them together into a ball of dough and roll it out multiple times.
- Gently lift the cut out from the wax/parchment paper and gently use your fingers to shape the head into a more oblong shape by lightly pressing in at the sides.
- Using a pastry brush lightly dipped in water, paint a thin layer of water over the cookie dough cutout.
- Generously sprinkle the Edible Wookie Fur Mixture over the damp cookie cutout, ensuring that the shape is well covered with it.
- Place the covered cookie cutout on a nonstick baking sheet and reshape if needed. Note – do NOT use parchment paper on the baking sheet as this will make the cookies spread out more and lose their shape when baked.
- Bake in the oven for 13 minutes.
- Remove from the oven and let the cookies cool completely on the baking sheet before you decorate.
- Use melted chocolates, colored royal icing, or tinted butter cream to add as much or as little decorations as you want.
